A built-in electric fireplace is one of the easiest ways to elevate a living room, bedroom, or basement and give the space a modern, finished look. Whether you are planning a simple upgrade or building a full feature wall, proper wall preparation is the key to achieving a clean appearance and a safe installation.
This step-by-step guide from the experts at Zoroast Fireplace Store Toronto walks you through the wall preparation process so you can install your electric fireplace with confidence and achieve a flawless final result.
1. Choose the Right Fireplace Size and Depth
Before any framing or wall changes begin, you need to select the exact fireplace model. This decision influences every step that follows.
Important factors to consider include:
- Width, with common sizes such as 50, 60, 72, and 100 inches
- Depth, ranging from slim to standard or deep models
- Installation style, either fully recessed or partially recessed
- Heat output direction, which is typically front vented on built-in electric fireplaces
Slim-profile fireplaces are designed to fit inside standard 2×4 framing. Deeper models often require 2×6 framing or a custom bump-out to provide enough clearance.
2. Select the Best Wall Location
Choosing the right wall ensures your fireplace looks great and functions properly. Take time to plan for:
- Television placement if you plan to mount one above the fireplace
- Furniture layout and seating distance
- Heat airflow so warm air is not blocked
- Access to electrical power
- Design potential for a feature wall using tile, stone, or paneling
Many homeowners opt for a combined fireplace and TV media wall. This approach requires careful planning for hidden wiring and a clean finish.
3. Assess and Prepare the Wall Structure
Although electric fireplaces are lighter than gas or wood-burning units, they still require solid framing for safe installation.
Key preparation steps include:
- Locating wall studs with a stud finder
- Framing the opening exactly to manufacturer specifications
- Installing horizontal supports if required
- Confirming everything is level, square, and secure
Following the manufacturer’s framing diagram ensures a precise fit and reliable performance over time.
4. Install a Dedicated Power Outlet Inside the Opening
Every built-in electric fireplace requires proper electrical setup:
- A standard 120V outlet installed inside the wall cavity
- A dedicated circuit is strongly recommended for fireplaces 60 inches and larger
The outlet must be located inside the framing so the fireplace can sit flush against the wall with no visible cords. If you are unsure about electrical requirements or local codes, working with a licensed electrician or professional installer is highly recommended.
5. Build the Framing Box
Once electrical work is complete, the framing can be finalized:
- Install vertical studs on both sides of the opening
- Secure a header across the top
- Measure carefully and confirm dimensions match the manufacturer’s specifications
- Check that everything is level and plumb
Slim units typically work with 2×4 framing, while deeper fireplaces usually require 2×6 lumber.
6. Test-Fit and Test the Fireplace
Before finishing the wall, always test the fireplace:
- Slide the unit into the opening
- Plug it in and power it on
- Test flame effects, heat output, and remote functions
- Ensure ventilation openings remain clear
- Confirm the unit sits centered and flush
Testing at this stage allows adjustments before drywall or finishes are installed, which can save time and prevent costly mistakes.
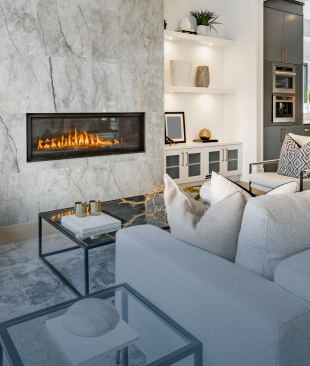
7. Apply Your Wall Finish
Your finish material defines the overall look of the fireplace wall. Popular choices include:
- Tile in matte, polished, or textured styles
- Large-format slabs for a seamless, high-end appearance
- Stone veneer for natural texture
- Shiplap or wood panels for warmth
- Smooth painted drywall for a clean, minimalist design
If a TV will be installed above the fireplace, make sure all power and HDMI wiring is run before applying the final finish.
8. Final Pre-Completion Checklist
- Framing matches manufacturer specifications
- Power outlet is properly positioned
- Fireplace functions have been fully tested
- Unit is level and flush with the wall
- Vent openings are clear
- Wall finishes meet safety guidelines
- TV wiring has been tested if applicable
When to Hire Professional Installation Services
While electric fireplaces are simpler than gas or wood-burning models, professional installation ensures electrical work meets local codes, framing is accurate, the fireplace sits flush and secure, and the finished wall looks clean and intentional.
Professional installation from an experienced Fireplace Company is especially important for large linear fireplaces between 60 and 100 inches wide, where precision matters most.
Get Expert Help at Zoroast Fireplace Store Toronto
Zoroast offers everything you need for a successful fireplace project:
- Toronto’s largest fireplace showroom
- Over 1,000 electric fireplace models available
- Expert guidance on sizing, placement, and wall preparation
- Same-day pickup on select models
- Professional installation support
If you are planning a built-in electric fireplace, visit our Greater Toronto Area showroom or contact our team for personalized recommendations tailored to your space and style. Transform your home with confidence by working with a trusted Toronto fireplace expert.
Toronto's Fireplace Store
Book an appointment
- +1 (416) 899-9998
- Unit 2, 535 Millway Avenue, Concord